Fri Mar 01 2024
Dynamic OG images with Next.js
Tags:
I really appreciate the efforts of the Next.js team to improve the overall developer experience down to the smallest detail, and the ability to dynamically generate Open Graph images is just another little cute thing that is super cool. All the Open Graph images for this blog are generated automatically, and it only takes a couple of functions to do it! Here's how.
What do you need opengraph images for
An Open Graph image is a preview picture, like a thumbnail, that is displayed when the link is shared on social media (Twitter, LinkedIn, Facebook, to name a few). It usually has the same style as the website in question, and contains pretty much everything you want to summarise the page and get idle social media lurkers to click on it: something like a post title and sometimes a short description, maybe a logo or an image. Impressions really do matter, so well-designed OG images are crucial!
Static OG images
It is still quite common to make static OG images, i.e. to have an already created OG image at hand. You just have to follow these steps:
- Have your image ready
As mentioned before, the OG image is the face card of your website, so take some time to make it ✨ extra ✨ on-brand and captivating. You should keep in mind the format though: the most recommended is 1200 pixels x 630 pixels (1.91/1 ratio).
- Make sure it is accessible via an absolute URL
You can upload it to a CDN or put it in a public content folder in your codebase - you just need an absolute path to it.
- Add OG meta tags to your website
It is obviously necessary to have a full set of meta tags ready, not just your og:image. If you are just adding meta tags to the <head> as static code, I highly recommend using some kind of generator tool like MetaTags.io to have a whole bunch of them generated for you.
Here's what you'd add for the OG image only (yes, you need a separate twitter:image tag):
<meta property="og:image" content="https://mywebsite.com/og-image.png" />
<meta property="twitter:image" content="https://mywebsite.com/og-image.png" />
- Test!
Try to test as much as you can: Facebook, Twitter and LinkedIn as a minimum to make sure everything loads and looks perrrrfect.
Small tip: try LinkedIn Post Inspector to check your metadata outside of LinkedIn + it helps a LOT with resetting everything when LinkedIn is acting up (and it always is) by aggressively caching OG images and never updating them.
Generated OG images with Next.js
Next.js allows you to generate OG images with the code, without having to create, store and serve pre-made OG images. Your images will be generated at build time and cached (in most cases) without you having to worry about any of this. You also have complete freedom to implement this per route (for example, to have generated images only for /posts/[slug], but not for /account), and you still have the ability to use static images as well. Pretty dope!
Check out Next.js docs to check out some examples along with the most common examples.
Having tried generating OG images for my blog, I can confidently say that it works great: it is very lightweight, reliable and quite easy to implement, it works out of the box everywhere I have tried. It gives you a lot of flexibility in what you can actually put into the OG image and how you can style it. Essentially, you write a JSX-like component and have CSS at your disposal, which should come quite naturally to you in the Next.js world.
How to do it
Assuming you already have your Next.js project, let's implement the generation function (or is it a component? kinda hard to tell, you'll see in a moment...).
In my case, I had implemented it for the posts/[slug] route, so let's go with that:
- In your
posts/[slug]route, add a file calledopengraph-image.tsx(or .jsx, if you are using JavaScript).
- Inside, we're going to add this piece of code:
In opengraph-image.tsx:
import { ImageResponse } from "next/og";
export const runtime = "edge"; // a runtime to generate your images, Edge is the lightweight version of Node, exactly what we need to execute this thing fast.
// Node runtime is not supported for OG images anyway https://vercel.com/docs/functions/og-image-generation
// You can read more on runtimes in Next.js docs: https://nextjs.org/docs/app/building-your-application/rendering/edge-and-nodejs-runtimes
export const size = {
width: 1200, // standard sizes for the OG image
height: 630, // do not recommend to change
};
export const contentType = "image/png"; // necessary to add to preserve the content type, even if it is not used in the code below
export default async function Image({ params }: { params: { slug: string } }) {
return new ImageResponse(
(
/* Just your usual (almost) JSX layout. Imagine you are styling a component! */
<div
style={{
display: "flex",
flexDirection: "column",
backgroundColor: "#fac17a",
padding: "20px",
height: "100%",
width: "100%",
}}
>
<p
style={{
fontSize: 100,
}}
>
{params.slug}
</p>
<p
style={{
fontSize: 50,
}}
>
by lazy ocean
</p>
</div>
),
{
...size,
}
);
}
Now, if we go to the posts/dynamic-og-image and check out the link we now have in <head> under property="og:image", here's what's there:
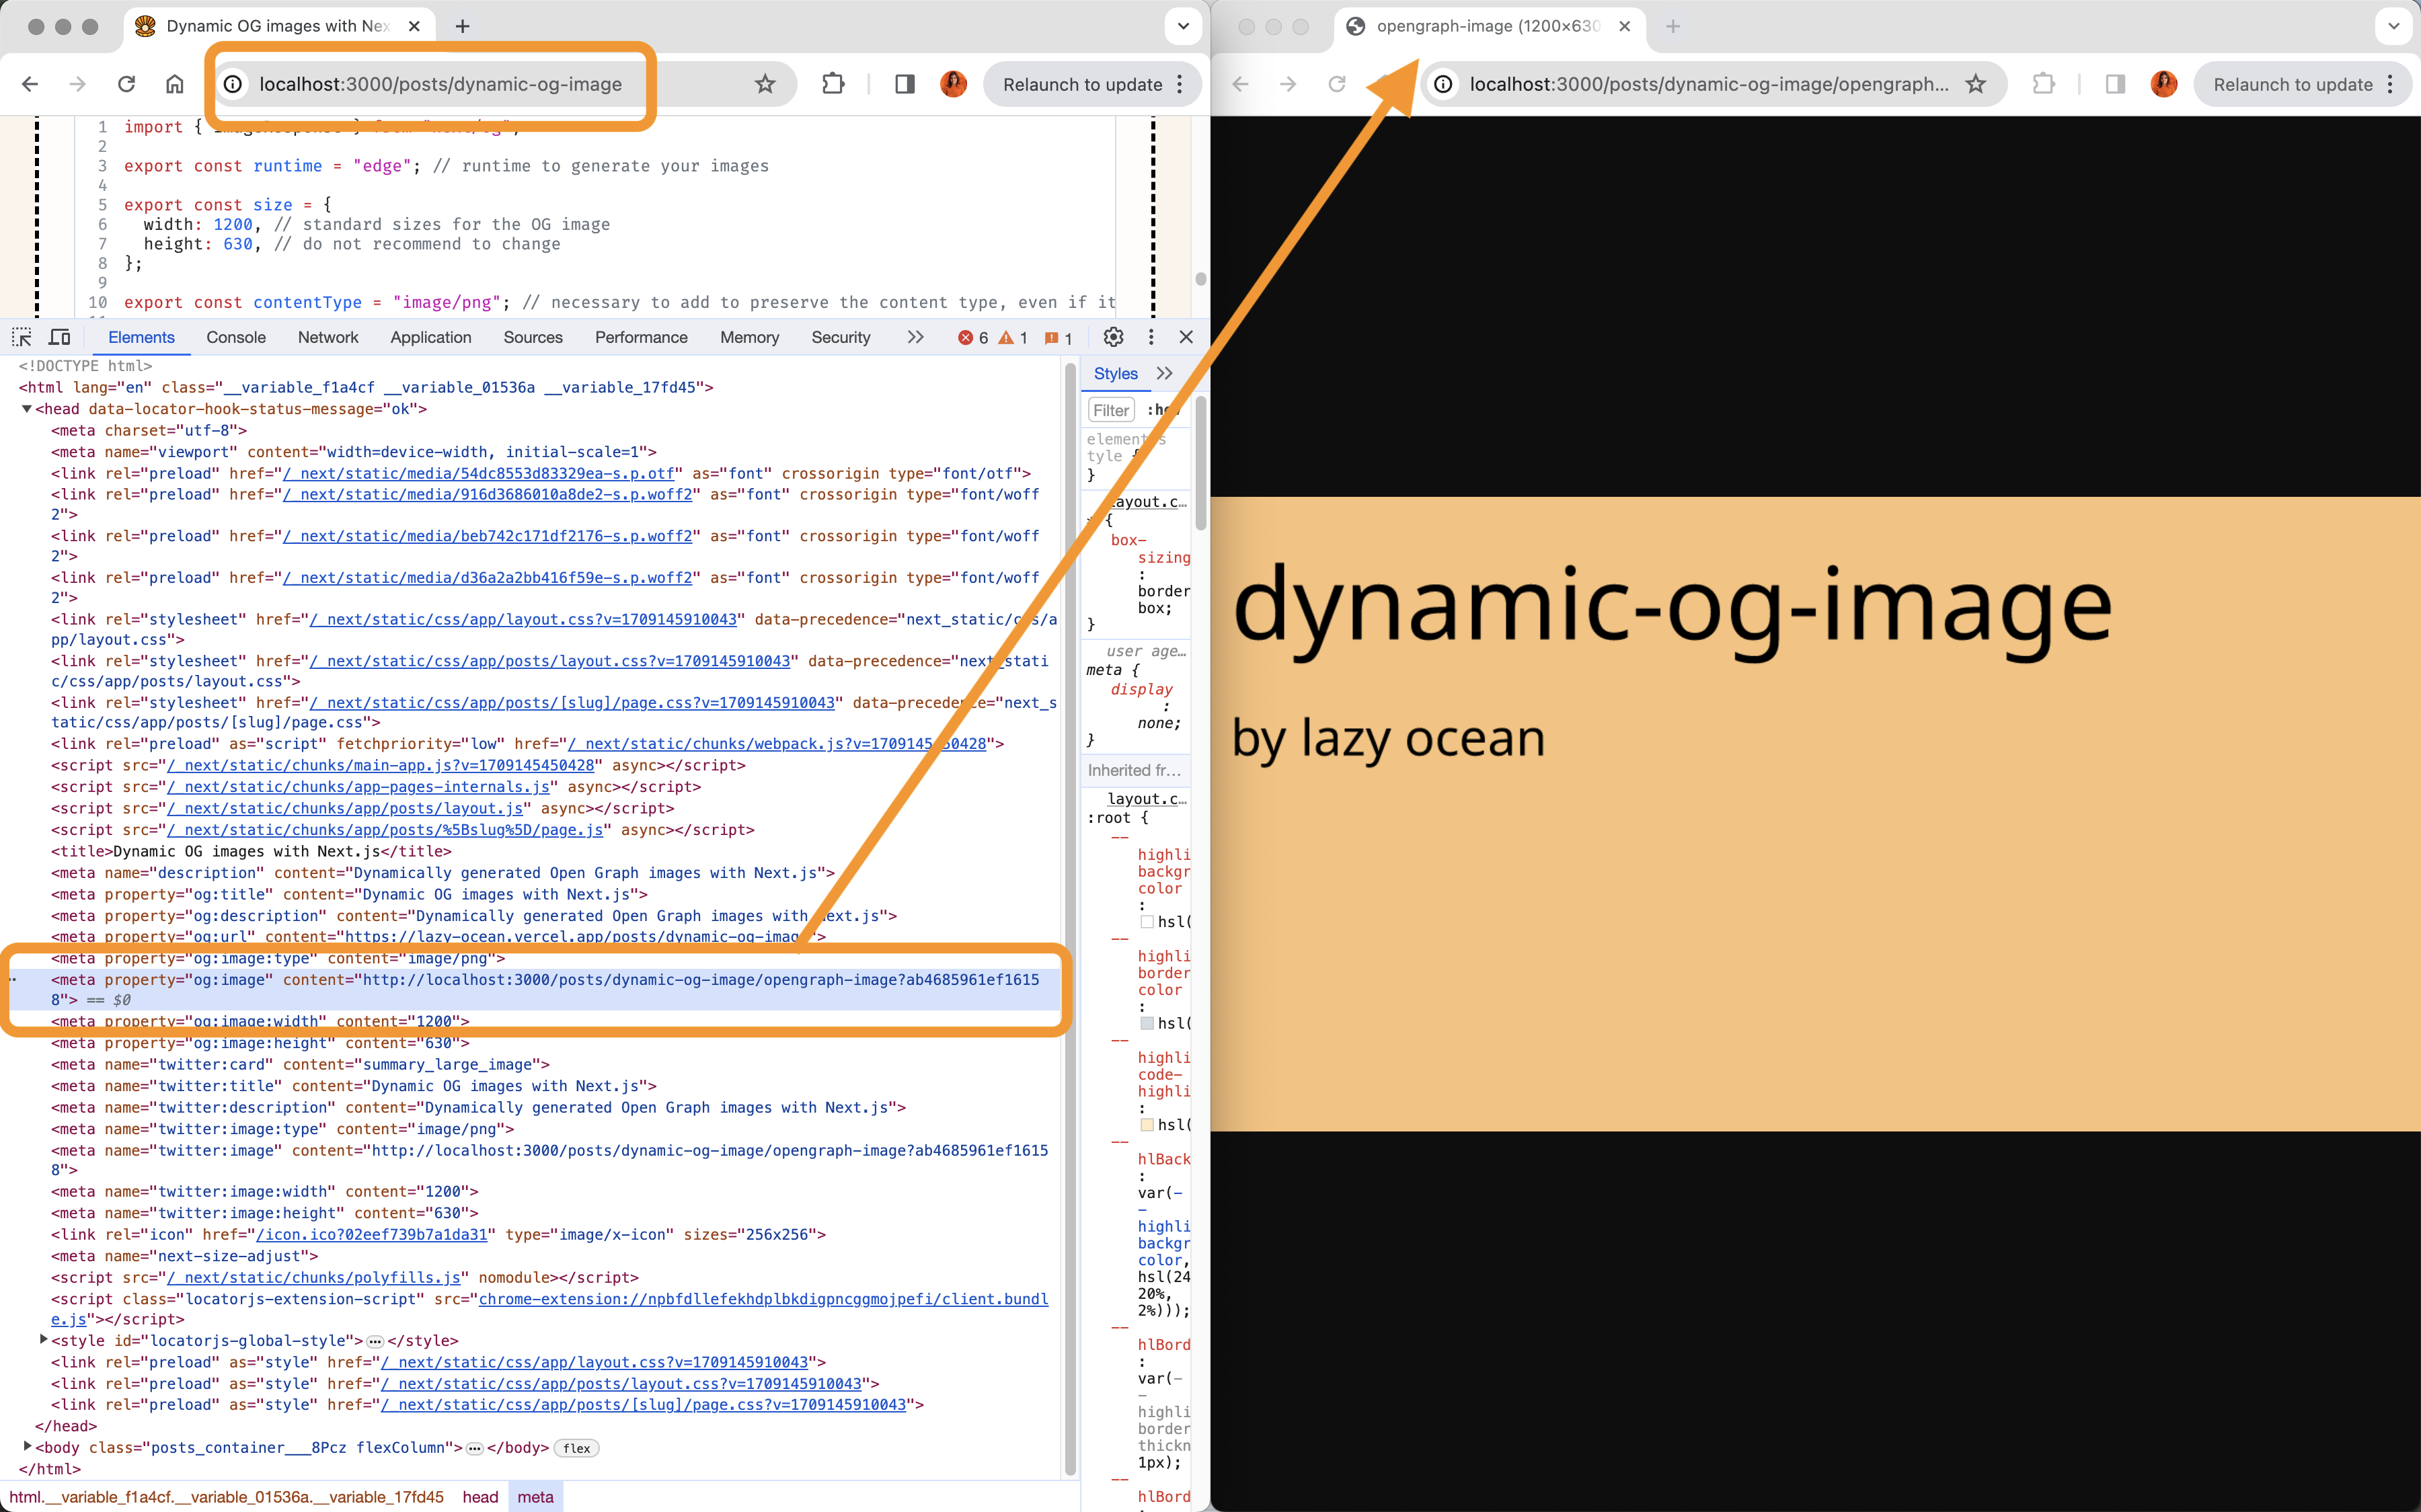
Not bad for a first draft, given that it just... works, without any fuss with tags and images, huh?
- Let's style it a bit more, starting with a custom font and a tiny bit of styling:
In opengraph-image.tsx:
export default async function Image({ params }: { params: { slug: string } }) {
/* Loading font from a /public folder.
NOTE: It does not have to be /public - you can keep a font for it in the same folder if you want. */
const fontData = await fetch(
new URL(
"../../../../public/san-de-more/SandeMore-Regular.otf",
import.meta.url
)
).then((res) => res.arrayBuffer());
return new ImageResponse(
(
<div
style={{
backgroundColor: "#fbf4ec",
width: "100%",
height: "100%",
display: "flex",
alignItems: "center",
justifyContent: "center",
flexDirection: "column",
padding: "40px",
textAlign: "center",
border: "10px dashed black",
}}
>
<p
style={{
fontSize: 100,
}}
>
{params.slug}
</p>
<p
style={{
fontSize: 50,
}}
>
by lazy ocean
</p>
</div>
),
{
...size,
/* adding your font: */
fonts: [
{
name: "font",
data: fontData,
style: "normal",
weight: 400,
},
],
}
);
}
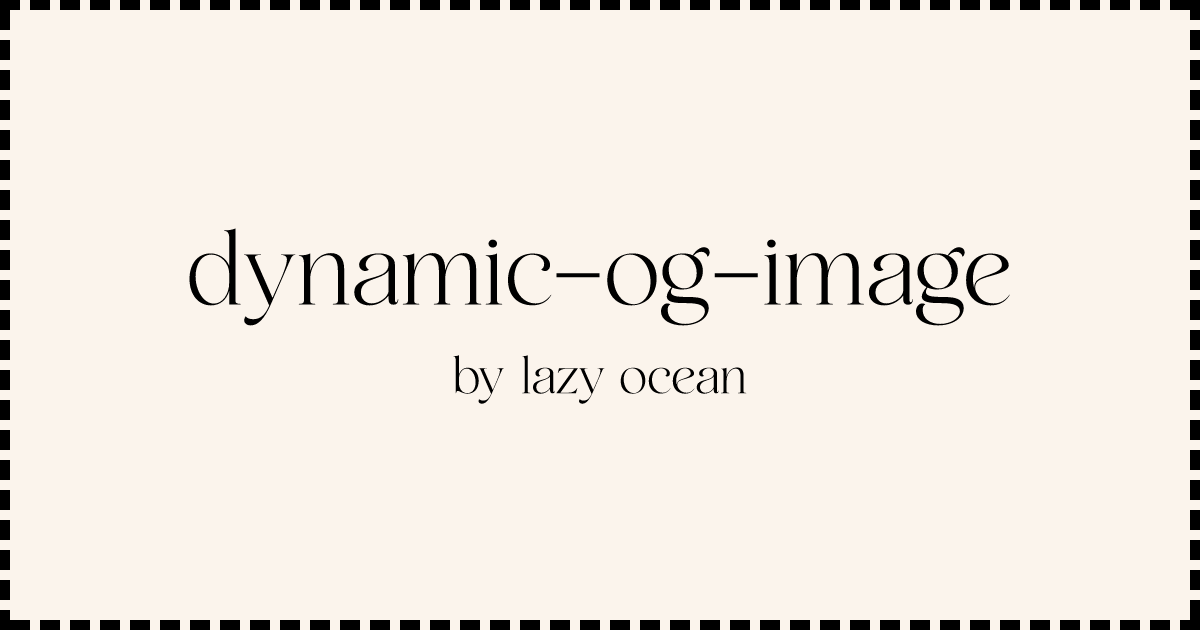
Here's what we've got now: it's getting better!
- Now that we have the basics set up, we need to work out how to use an actual post title.
It really does depend on how your posts are managed.
As per Next.js docs example: you can have an API route, for example, or any other external resource that could provide any data you need for your OG image, like title, description, anything else:
// In your OG Image function:
// Some API that returns { title: '<post title>' }
const post = await fetch(`http://{api}/posts/${params.slug}`).then((res) =>
res.json()
);
// To use in your JSX markup as:
<p
style={{
fontSize: 100,
}}
>
{post.title}
</p>
In my case, it turned out to be a bit tricky with the Markdown managed posts data, and the Node.js runtime isn't supported, and I didn't really want to have a full-blown API to serve some static data. The best and simplest solution for me was just to have a util function and a separate data object that stores the post data and can be pulled on demand.
In opengraph-image.tsx:
// In my OG Image function:
const post = getPostsName(params.slug);
// to use as
<p
style={{
fontSize: 100,
}}
>
{post.title}
</p>
In utils/getOGMeta.ts:
const postsMap: { [key: string]: { title: string; images: string } } = {
"dynamic-og-image": {
title: "Dynamic OG image with Next.js",
images: "stickers/email.png,stickers/css.png,stickers/webdesign.png",
},
};
export const getOGMeta = (slug: string) => postsMap[slug];
Here's what we have now:

But that's too bland, something funky is missing...
- You may have noticed that I have some links to images in my
getPostsName()function:
In utils/getOGMeta.ts:
const postsMap: { [key: string]: { title: string; images: string } } = {
"dynamic-og-image": {
title: "Dynamic OG image with Next.js",
images: "stickers/email.png,stickers/css.png,stickers/webdesign.png",
},
};
In fact, these are the same stickers I use for the blogpost card, they are in the public/stickers folder. I can use them in my generated OG images!
In opengraph-image.tsx:
// ...rest of the opengraph-image.tsx
<div style={{ display: "flex", gap: "20px", marginBottom: "20px" }}>
{post.images?.split(",").map((img: string) => (
<img
style={{
width: "100px",
}}
key={img}
src={`${
process.env.NODE_ENV === "production" // to build correct urls to images in /public
? "https://lazy-ocean.vercel.app/"
: "http://localhost:3000/"
}${img}`}
alt=""
role="presentation"
/>
))}
</div>
// ...rest of the opengraph-image.tsx
And here's the final result:

Code
The final code in opengraph-image.tsx:
import { ImageResponse } from "next/og";
import { getOGMeta } from "@/api/getOGmeta";
export const runtime = "edge";
export const size = {
width: 1200,
height: 630,
};
export const contentType = "image/png";
export default async function Image({ params }: { params: { slug: string } }) {
const fontData = await fetch(
new URL(
"../../../../public/san-de-more/SandeMore-Regular.otf",
import.meta.url
)
).then((res) => res.arrayBuffer());
const post = getOGMeta(params.slug);
return new ImageResponse(
(
<div
style={{
backgroundColor: "#fbf4ec",
width: "100%",
height: "100%",
display: "flex",
alignItems: "center",
justifyContent: "center",
flexDirection: "column",
padding: "40px",
textAlign: "center",
border: "10px dashed black",
}}
>
<div style={{ display: "flex", gap: "20px", marginBottom: "20px" }}>
{post.images?.split(",").map((img: string) => (
<img
style={{
width: "100px",
}}
key={img}
src={`${
process.env.NODE_EN === "production"
? "https://lazy-ocean.vercel.app/"
: "http://localhost:3000/"
}${img}`}
alt=""
role="presentation"
/>
))}
</div>
<p
style={{
fontSize: 100,
}}
>
{post.title}
</p>
<p
style={{
fontSize: 50,
}}
>
by Vladlena Panchenko
</p>
</div>
),
{
...size,
fonts: [
{
name: "font",
data: fontData,
style: "normal",
weight: 400,
},
],
}
);
}
You can also check this out on Github (opengraph-image.tsx)
Happy coding!